I didn’t connect the wings and the antennae, but you could if you wanted. The hole pattern is difficult, but the sewing is intermediate.


I didn’t connect the wings and the antennae, but you could if you wanted. The hole pattern is difficult, but the sewing is intermediate.
An intermediate bind, easy hole pattern. Leave a comment if you have a specific tutorial you would like to see next.
**click on an image to enlarge**
hole pattern

EXIT = needle pointed DOWN and ENTER = needle pointed UP
=====
enter 1, leave a tail but don’t knot it, wrap around right edge
enter 1 again, wrap around right edge at angle across from 2
enter 1 again
exit 2
enter 3, wrap around right edge, thread needle through loop from 1, point up
enter 3 again
wrap around right edge, enter 3 again
exit 4
enter 5
exit 6
enter 5
exit 4, wrap around spine at an angle to below 7, exit 4 again
enter 3, wrap around spine at an angle to below 7, enter 3 again
exit 2
enter 1
exit 6
enter 7
exit 4
enter 7
exit 6
enter 8
exit 7
enter 10
exit 7
enter 8
exit 9
enter 10, wrap around spine, thread needle through loops from 4 and 3, point right
enter 10 again
exit 11, wrap around spine, thread needle through loops from 4 and 3, point left
exit 11 again
enter 12
exit 13
enter 12
exit 11, wrap around spine to an angle below 14, exit 11 again
enter 10, wrap around spine to an angle below 14, enter 10 again
exit 9
enter 8
exit 13
enter 14
exit 11
enter 14
exit 13
enter 15
exit 14
enter 17
exit 14
enter 15
exit 16
enter 17, wrap around spine, thread needle through loops from 11 and 10, point right
enter 17 again
exit 18, wrap around spine, thread needle through loops from 11 and 10, point left
exit 18 again
enter 19
exit 20
enter 19
exit 18, wrap around spine to an angle below 21, exit 18 again
enter 17, wrap around spine to an angle below 21, enter 17 again
exit 16
enter 15
exit 20
enter 21
exit 18
enter 21
exit 20
enter 22
exit 21
enter 24
exit 21
enter 22
exit 23
enter 24, wrap around spine, thread needle through loops from 18 and 17, point right
enter 24 again
exit 25, wrap around spine, thread needle through loops from 18 and 17, point left
exit 25 again
enter 26
exit 27
enter 26
exit 25, wrap around spine to an angle below 28, exit 25 again
enter 24, wrap around spine to an angle below 28, enter 24 again
exit 23
enter 22
exit 27
enter 28
exit 25
enter 28
exit 27
enter 29
exit 28
enter 31
exit 28
enter 29
exit 30
enter 31, wrap around spine, thread needle through loops from 25 and 24, point right
enter 31 again
exit 32, wrap around spine, thread needle through loops from 25 and 24, point left
exit 32 again
wrap around left edge, exit 32 again
wrap around left edge to an angle across from 33, exit 32 again
enter 33
exit 34, wrap around left edge, thread needle through loop from 32, point down
exit 34 again
wrap around left edge, exit 34 again
enter 33
exit 32
enter 31
exit 30
enter 29
exit 34
enter 29
exit 27
enter 22
exit 20
enter 15
exit 13
enter 8
exit 6, tie off with tail from 1
Another intermediate bind.


Dedicated to former adviser, Robert…I know you miss my ‘butterfly’ days… ![]()
An intermediate bind with a difficult hole pattern.
**click on an image to enlarge**
hole pattern

sewing pattern

EXIT = needle pointed DOWN and ENTER = needle pointed UP
=====
enter 1, (leave a tail but don’t knot it) wrap around right edge, enter 1 again
exit 2
enter 3
exit 4
enter 5
exit 6
enter 7
exit 8
enter 5
exit 8
enter 7
exit 6
enter 5
exit 4
enter 3
exit 2
enter 6
exit 2
enter 1
exit 9
enter 3
exit 10
enter 5
exit 10
enter 3
exit 9
enter 11
exit 12
enter 10
exit 12
enter 5
exit 12
enter 13
exit 14
enter 13
exit 12
enter 14
exit 5
enter 14
exit 15
enter 7
exit 15
enter 16, wrap around spine at an angle to below 19, enter 16 again
exit 15
enter 14, wrap around spine, point needle to the right, thread needle through loop from 16, enter 14 again
exit 17
enter 18
exit 16
enter 19
exit 17
enter 19
exit 16
enter 18
exit 17
enter 14
exit 20, wrap around spine at an angle to below 21, exit 20 again
enter 14
exit 12
enter 21
exit 22
enter 23
exit 24
enter 23
exit 25
enter 23
exit 22
enter 21
exit 26
enter 25
exit 27
enter 25
exit 26
enter 21
exit 28
enter 29
exit 30
enter 31 wrap around left edge, enter 31 again
exit 32
enter 33
exit 34
enter 35
exit 36
enter 37
exit 38
enter 35
exit 38
enter 37
exit 36
enter 32
exit 36
enter 35
exit 34
enter 33
exit 32
enter 31
exit 30
enter 33
exit 39
enter 35
exit 39
enter 33
exit 30
enter 29
exit 28
enter 39
exit 28
enter 35
exit 28
enter 40
exit 41
enter 40
exit 28
enter 41
exit 35
enter 41
exit 38
enter 41
exit 42
enter 37
exit 42
enter 43, wrap around spine at angle to below 46, enter 43 again
exit 42
enter 41, thread needle through loop from 43, point needle to the left, enter 41 again
exit 44
enter 45
exit 43
enter 46
exit 44
enter 46
exit 43
enter 45
exit 44
enter 41
exit 47, wrap around spine, thread needle through loop from 20, point needle right, exit 47 again
enter 41
exit 28
enter 21
exit 12
enter 11
exit 9
tie off with tail from 1
An easy hole pattern, and an advanced beginner sewing pattern. 
A fairly straightforward beginning bind and hole pattern.

…or at least how I understand it. I’ve had many questions since I began posting my own Japanese stab bind designs: about how I create them, the thought process behind the designs and sewing mechanisms, the tools I use, etc. I’ll break down my personal process in another post; for this one I want to explain some of the basics for those of you just starting out in the world of bookbinding and are looking for a style that allows for incredible expression.
If you have researched bookbinding at all, you will have most likely come across the basic Japanese stab bind (JSB). It looks like this: four holes, four wraps around the spine, and a wrap around each edge.

Fold line
The most import part of the traditional JSB to remember is what I call the ‘fold line’. This is made by the holes that are farthest away from the spine, or closest to the content on the inside of your book. It is vital that they be in a straight line, otherwise your book will end up with a crooked fold and the cover will be more likely to tear.

Having thread run along the fold line is helpful because it keeps the cover from tearing off as easily – there is more surface for the cover to bend against, instead of just single holes. It also keeps with the traditional JSB look. I’ve only sewn a handful of binds that didn’t have thread reinforcing the fold line, but the holes were even.
“Butterfly” bind.

Edges and spine
It isn’t absolutely necessary to include the edge wraps, but good practice to do so. If you have a tendency to sew loosely, or if you ever have trouble making your knot tight enough, it is important to include the edge wraps. They also help with reinforcing the fold line, and keep the book together better. The spine needs to always have some kind of wrap. As you can see from the example binds in this post, there are numerous ways to do this.
Holes
The absolute minium of necessary holes would be one hole…but you would end up with a fairly wobbly and shaky book and your design would be limited to a triangle. Two holes would still create a weak bind, but if the book were quite small, or had only a few pages, it would probably work. But good news: there is no maximum limit to how many holes your design can have, and it doesn’t matter if it is an even or an odd number. You are only limited by your patience, persistence, and stamina when it comes to drilling all of those holes! I would say my patterns have an average of 30 holes each.
“Crocus” has 53 holes.

**A potential problem area is how close your holes are to each other…the closer they are, the more likely your book block will rip when you pull the thread tight. And NOTHING is more disheartening than when that happens! I try to keep my holes at least .25″ (or 7 mm) apart. On occasion I will place them closer, but I then sew the book very, very carefully.
Process
This is where it gets a bit complicated to explain by using words and not physically demonstrating (maybe one day I’ll try to create a video tutorial).
The traditional JSB with 4 holes has the sewing start at hole #2. But if you have a complicated design, it’s easier to start at the very edge. The central objective of JSB is to sew your entire bind while never repeating the same line; in other words, never having two threads between the same two holes.

To achieve this, you essentially sew half of the design in one direction, then at the halfway mark you return back to the start by sewing the pattern in reverse. You must get the concept “over-under-over-under”…then, “under-over-under-over” firmly in your mind. This is fairly easy to figure out on a geometric pattern – and it can become convoluted with an organic/non-geometric design very rapidly! The ease or difficulty is very much dependent on what the design is and who is sewing it.
For example, below is “mushroom”, which is a geometric pattern with 5 repeats. The first ‘mushroom’ segment is completed before the second is begun. In fact, because of the gap between each segment, each mushroom is sewn exactly the same way. If they had been touching at the fold line, the needle direction of the second mushroom would have been completely opposite of the first (every ‘enter’ would become an ‘exit’). The third mushroom would have been like the first, the fourth like the second, etc.

In “peacock”, an organic pattern, the sewing starts in the middle, creating the feather’s rachis first, then the center circles, then the final circle with fringe coming off of it. It looks complicated, but once you have mastered the concept of ‘over-under-over under,’ it isn’t too difficult to figure out.

“Woven” is an exception to the rule: it is a geometric pattern, but the sewing actually goes from one side to the other and back again just to complete one ‘V’ shape. But the edges and the sides still use the ‘over-under-over-under’ approach.

======
Early in my experimenting I decided that straight perpendicular lines by themselves were boring. I figured out that the spine could be wrapped with a ‘V’ shape by crossing one loop with another previous loop (or loops). So far the only shape that seems impossible is a circle, but I’m working on it!
I hope this is helpful. If you ever run into a snag with your own pattern or design (or with one of mine) send me an email. And send pictures of your creations, I would love to see!
By popular request. Next up, ‘woven’.
An fairly beginner bind and a beginner hole pattern.
**click on an image to enlarge**
hole pattern
 sewing pattern

EXIT = needle pointed DOWN and ENTER = needle pointed UP
=====
enter 1, (leave a tail but don’t knot it) wrap around right edge, enter 1 again
exit 4
enter 3, wrap around right edge, enter 3 again
wrap around spine, enter 3 again
exit 4
enter 1, wrap around spine at angle to between 1 and 2, enter 1 again
exit 2
enter 3
exit 2, wrap around spine, thread needle under loop from 1, point right, exit 2 again
enter 5
exit 7
enter 4, wrap around spine, enter 4 again
exit 7
enter 5, wrap around spine at angle to between 5 and 6, enter 5 again
exit 6
enter 4
exit 6, wrap around spine, thread needle under loop from 5, point right, exit 6 again
enter 8
exit 10
enter 7, wrap around spine, enter 7 again
exit 10
enter 8, wrap around spine at angle to between 8 and 9, enter 8 again
exit 9
enter 7
exit 9, wrap around spine, thread needle under loop from 8, point right, exit 9 again
enter 11
exit 13
enter 10, wrap around spine, enter 10 again
exit 13
enter 11, wrap around spine at angle to between 11 and 12, enter 11 again
exit 12
enter 10
exit 12, wrap around spine, thread needle under loop from 11, point right, exit 12 again
enter 14
exit 16
enter 13, wrap around spine, enter 13 again
exit 16, wrap around spine, exit 16 again
wrap around left edge, exit 16 again
enter 14, wrap around spine at angle to between 14 and 15, enter 14 again
exit 15
enter 13
exit 15, wrap around spine, thread needle under loop from 14, point right, exit 15 again
wrap around left edge, exit 15 again
enter 14
exit 12
enter 11
exit 9
enter 8
exit 6
enter 5
exit 2, tie off with tail from 1
I’ll be honest, I’ve been working on this tutorial for days. It might be the most convoluted one. I’ve checked and double-checked for errors. If you find one, leave a comment and I’ll fix it as soon as I can.
But ‘woven’ is not that difficult to sew once you understand the technique. If you’ve tried the marionette tutorial, then you could sew this bind with that method. However…if you can figure this technique out, it will give you more options! The ‘woven’ part will actually be partially over the spine edge – though the diagram doesn’t show it well. I rate this pattern somewhere in the intermediate range, with beginning holes.
A few things to remember: when you are making the first diagonal Xs, do not make the knot too tight. Also, leave a bit of slack in the first three Xs. Your fingers will thank you when you try to thread the needle under the massive knot to make the last X between holes 16 and 20. If when you first read the pattern and can’t visualize what to do, just think how an X is written… you sew the first diagonal from the beginning hole to the matching hole on the opposite side of the pattern, and then complete the X on the way back to the original hole. Clear as mud? Well – jump in and try it and hopefully it will make sense!
EXIT = needle pointed DOWN and ENTER = needle pointed UP
=====
enter 1, (leave a tail but don’t knot it) wrap around right side, enter 1 again
exit 2, wrap around spine, exit 2 again
enter 3, wrap around spine, enter 3 again
exit 4, wrap around spine, exit 4 again
enter 5, wrap around spine, enter 5 again
exit 6, wrap around spine, exit 6 again
enter 7, wrap around spine, enter 7 again
exit 8, wrap around spine, exit 8 again
enter 9, wrap around spine, enter 9 again
exit 10, wrap around spine, exit 10 again
enter 11, wrap around spine, enter 11 again
exit 12, wrap around left side, exit 12 again
enter 13, wrap around left side, enter 13 again
exit 14, wrap around left side, exit 14 again
enter 15, wrap around left side, enter 15 again
exit 16, wrap around left side, exit 16 again
wrap around spine, exit 16 again
enter 15
exit 14
enter 13
exit 12
enter 11
exit 10
enter 9
exit 8
enter 7
exit 6
enter 5
exit 4
enter 3
exit 2
enter 1, thread needle under 2, over 3, under 4, over 5, under 6, at angle to between 6 and 7; *opposite side* thread needle under 7, over 8, under 9, over 10, under 11
enter 12, thread needle under 11, over 10, under 9, over 8, under 7; thread needle backward (point left) under loop from 1, pull to the right (knot/twist should be vertical), *opposite side* thread needle under 6, over 5, under 4, over 3, under 2
enter 1
exit 17, thread needle over 2, under 3, over 4, under 5, over 6, thread needle under knot/twist between 6 and 7, point right, *opposite side* thread needle over 7, under 8, over 9, under 10, over 11
exit 13, thread needle over 11, under 10, over 9, under 8, over 7, thread needle under twist between 7 and 6, point left, *opposite side* thread needle over 6, under 5, over 4, under 3, over 2
exit 17
enter 18, thread needle under 2, over 3, under 4, over 5, under 6, thread needle under twist between 6 and 7, point right, *opposite side* thread needle under 7, over 8, under 9, over 10, under 11
enter 14, thread needle under 11, over 10, under 9, over 8, under 7, thread needle under twist between 7 and 6, point left, *opposite side* thread needle under 6, over 5, under 4, over 3, under 2
enter 18
exit 19, thread needle over 2, under 3, over 4, under 5, over 6, thread needle under twist between 6 and 7, point right, *opposite side* thread needle over 7, under 8, over 9, under 10, over 11
exit 15, thread needle over 11, under 10, over 9, under 8, over 7, thread needle under twist between 7 and 6, point left, *opposite side* thread needle over 6, under 5, over 4, under 3, over 2
exit 19
enter 20, thread needle under 2, over 3, under 5, over 5, under 6, **thread needle under twist between 6 and 7, don’t wrap knot,** *opposite side* thread needle under 7, over 8, under 9, over 10, under 11
enter 16, thread needle under 11, over 10, under 9, over 8, under 7, ••thread needle under twist between 7 and 6, don’t wrap knot,** *opposite side* under 6, over 5, under 4, over 3, under 2
enter 20, wrap around spine, enter 20 again,
wrap around right edge, enter 20 again
exit 19, wrap around right edge, exit 19 again,
enter 18, wrap around right edge, enter 18 again
exit 17, wrap around right edge, exit 17 again
tie off
This is from a super-old sketch that I never actually sewed. But I got a new toy (picture below) and I wanted to try it out on a simple test before using it on a real project. The design has only 9 holes, and they’re in a straight line! That almost never happens anymore, haha.
This bind is a blend of Marionette and Woven.

Exciting experiments and shenanigans are coming…

I have been reunited with my bookbinding tools! Also I have some free time to do more experiments now.
This bind has 84 holes. 84! It’s a bit ridiculous. But other than the prep taking forever, the actual sewing is straightforward. I wrapped the spine about 10.5 times to get the length of the string. 5.75″(14.6cm) wide, .25″(.64cm) thick.

An accidental animal print. 74 holes on this one. I suppose that a real animal print wouldn’t have repeats, but…oh well. The sides on this design are a bit tricky, as are the Vs on the spine. I wrapped the spine 8 times to get the thread length. 6″(15.24cm) wide, .25″(.64cm) thick.


I’ve been on a spiral kick lately. I was going for cinnamon rolls with this design, but was informed that it looked more like sushi. Later I might try a vertical, ‘stacked’ version so the sushi pattern is more obvious when the book is displayed correctly. But here you go! Advanced beginner, just because of the number of holes. Very easy to sew.
58 holes, 6″(15.24cm) wide, .25″(.64cm) thick. I wrapped the spine about 9 times to get thread length.


Another spiral. I am actually not too fond of snails, as I think they’re gross and slimy (and I encountered way too many when I lived in England)…but how could I not try for the stab pattern? You could modify this and make the snail’s body longer, but I thought it looked odd, so I shortened the spine width down by an inch.
I’d rate this bind as very easy. There are segments that could be easily missed while sewing the bottom edge, but it’s very simple to add in the missing stitches later.
39 holes. 5″(12.7cm) wide, .25″(.64cm) thick. I forgot to write down how many times I wrapped the spine for the thread length (sorry!), but I think that it was around 8 times.

I’m way behind in providing binding tutorials here, and I apologize if you asked me for one and I didn’t come through. It has been so long I can’t remember which design I was asked for last…so here is a poll with some of the most recently popular designs. Cast your vote and let me know which pattern needs a tutorial!

The maple leaf pattern tutorial, as requested in the poll! I’d say this one is pretty simple. The instructions for the ‘V’s at the edges are written differently than usual, but I hope it make it a bit easier.
*Tip: make holes 1, 14, and 26 a bit larger than the others, as the needle will have to go through them eight times.*
**click on an image to enlarge**
hole pattern

sewing pattern

EXIT = needle pointed DOWN and ENTER = needle pointed UP
=====
enter 1, leave a tail but don’t knot it
exit 2, wrap around right edge, exit 2 again
enter 1
exit 3
enter 1
exit 4
enter 1
exit 6
enter 1
exit 7
enter 1
exit 9
enter 1
exit 11
enter 1
exit 12
enter 11
exit 10
enter 9
exit 8, wrap around spine, exit 8 again
enter 7, wrap around spine
enter 6
exit 5, wrap around right edge, exit 5 again
wrap around spine, exit 5 again
enter 4, wrap around right edge
enter 3
exit 2
enter 3, wrap around right edge, thread needle through loop at edge, point up
enter 4
exit 5
enter 6, wrap around spine, thread needle through loop at edge, point right
enter 7
exit 8
enter 9
exit 10
enter 11
exit 12
enter 13
exit 14
enter 15
exit 14
enter 16
exit 14
enter 18
exit 14
enter 19
exit 14
enter 21
exit 14
enter 23
exit 14
enter 24
exit 23
enter 22
exit 21
enter 20, wrap around spine, enter 20 again
exit 19, wrap around spine
exit 18
enter 17, wrap around spine, enter 17 again
exit 16
enter 10
exit 15
enter 13
exit 15
enter 10
exit 16
enter 17
exit 18, wrap around spine, thread needle through loop at edge, point right
exit 19
enter 20
exit 21
enter 22
exit 23
enter 24
exit 25
enter 26
exit 27
enter 26
exit 28
enter 26
exit 30
enter 26
exit 31
enter 26
exit 33
enter 26
exit 34
enter 26
exit 35, wrap around left edge, exit 35 again
enter 34, wrap around left edge
enter 33
exit 32, wrap around left edge, exit 32 again
wrap around spine, exit 32 again
enter 31, wrap around spine
enter 30
exit 29, wrap around spine, exit 29 again
enter 28
exit 22
enter 27
exit 25
enter 27
exit 22
enter 28
exit 29
enter 30, wrap around spine, thread needle through loop at edge, point right
enter 31
exit 32
enter 33, wrap around left edge, thread needle through loop at edge, point down
enter 34
exit 35
enter 26
exit 25
enter 24
exit 14
enter 13
exit 12, tie off
I seem to have a backlog of patterns I have sketched but not sewn yet…lately I’ve been playing with triangles. Here are a couple:
“Tiara”… 28 holes. Beginner bind.

“Double arrows”…48 holes. Beginner bind.

Second place in the tutorial poll. A very simple bind, no twists or complicated V shapes. 58 total holes. If you’d rather have cinnamon rolls instead of sushi, ignore the steps marked with an asterisk “*”.
**click any image to enlarge**
hole pattern

sewing pattern

EXIT = needle pointed DOWN and ENTER = needle pointed UP
=====
enter 1, leave a tail but don’t knot it, wrap around right edge, enter 1 again
exit 2, wrap around spine, exit 2 again
enter 3
exit 4
enter 5
exit 6
enter 5
exit 4
enter 3
exit 2
enter 1
exit 7
enter 8
exit 9
enter 10
exit 11
enter 12
exit 13
enter 14
exit 15
enter 16
exit 17
enter 18
exit 19
enter 20
*exit 16
*enter 20
exit 19
enter 18
exit 17
enter 16
exit 15
enter 14
exit 13
enter 12
exit 11
enter 10
exit 9
enter 8
exit 7
enter 6
exit 21
enter 5, wrap around spine, enter 5 again
exit 22
enter 23
exit 24
enter 25
exit 24
enter 23
exit 22
enter 5
exit 21
enter 26
exit 27
enter 28
exit 29
enter 30
exit 31
enter 32
exit 33
enter 34
exit 35
enter 36
exit 37
enter 38
exit 39
*enter 35
*exit 39
enter 38
exit 37
enter 36
exit 35
enter 34
exit 33
enter 32
exit 31
enter 30
exit 29
enter 28
exit 27
enter 26
exit 25
enter 40
exit 24, wrap around spine, exit 24 again
enter 41
exit 42
enter 43, wrap around spine, enter 43 again
exit 44, wrap around left edge, exit 44 again
enter 43
exit 42
enter 41
exit 24
enter 40
exit 45
enter 46
exit 47
enter 48
exit 49
enter 50
exit 51
enter 52
exit 53
enter 54
exit 55
enter 56
exit 57
enter 58
*exit 54
*enter 58
exit 57
enter 56
exit 55
enter 54
exit 53
enter 52
exit 51
enter 50
exit 49
enter 48
exit 47
enter 46
exit 45
enter 44
exit 45
enter 40
exit 25
enter 26
exit 21
enter 6
exit 7, tie off
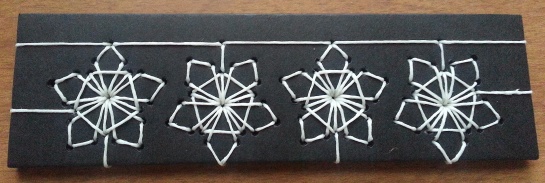
This bind has 84 holes, which makes it more complicated than it might be otherwise. Also, holes 24, 44, 64, and 84 need to be much larger than the others because there are 15 threads entering and exiting.
The tutorial was a bit complicated to write (though I don’t think it is as difficult to sew)…so if you find an error, please leave me a comment and I’ll correct it. I also broke up the written instructions so you can see where one snowflake ends and the next begins.
**click to enlarge**
hole pattern

sewing pattern

EXIT = needle pointed DOWN and ENTER = needle pointed UP
=====
enter 1, leave a tail but don’t knot it, wrap around right edge, enter 1 again
exit 5,
enter 6, wrap around right edge, enter 6 again
exit 7
enter 8
exit 9
enter 5
exit 9
enter 8
exit 7
enter 6
exit 5
enter 24
exit 6
enter 24
exit 7
enter 24
exit 8
enter 24
exit 9
enter 24
exit 10
enter 11
exit 12
enter 24
exit 12
enter 11
exit 10
enter 24
exit 13
enter 14
exit 15
enter 24
exit 15
enter 14
exit 13
enter 24
exit 16, wrap around spine at angle to below 24, exit 16 again
enter 24
exit 17, thread needle through loop from 16, point right, exit 17 again
enter 24
exit 18
enter 17
exit 20
enter 24
exit 20
enter 17
exit 18
enter 24
exit 21
enter 22
exit 23
enter 24
exit 23
enter 22
exit 21
enter 24
exit 5
enter 1
exit 2
enter 25
exit 44
enter 38
exit 2
enter 38
exit 44
enter 26
exit 27
enter 28
exit 44
enter 28
exit 27
enter 26
exit 44
enter 29
exit 30
enter 31
exit 44
enter 31
exit 30
enter 29
exit 44
enter 32
exit 33
enter 34
exit 44
enter 34
exit 33
enter 32
exit 44
enter 35
exit 36
enter 37
exit 44
enter 37
exit 36
enter 35
exit 44
enter 39
exit 40
enter 41, wrap around spine, enter 41 again
exit 42
enter 43
exit 39
enter 43
exit 42
enter 41
exit 40
enter 39
exit 44
enter 40
exit 44
enter 41
exit 44
enter 42
exit 44
enter 43
exit 44
(opposite side, weave needle under thread coming from 39 and 43) enter 25
exit 2
enter 3
exit 45
enter 46
exit 47
enter 48
exit 49
enter 45
exit 49
enter 48
exit 47
enter 46
exit 45
enter 64
exit 46
enter 64
exit 47
enter 64
exit 48
enter 64
exit 49
enter 64
exit 50
enter 51
exit 52
enter 64
exit 52
enter 51
exit 50
enter 64
exit 53
enter 54
exit 55
enter 64
exit 55
enter 54
exit 53
enter 64
exit 56, wrap around spine at angle to below 64, exit 56 again
enter 64
exit 57, thread needle through loop from 56, point right, exit 57 again
enter 64
exit 58
enter 59
exit 60
enter 64
exit 60
enter 59
exit 58
enter 64
exti 61
enter 62
exit 63
enter 64
exit 63
enter 62
exit 61
enter 64
exit 45
enter 3
exit 4
enter 65
exit 84
enter 78
exit 4
enter 78
exit 84
enter 66
exit 67
enter 68
exit 84
enter 68
exit 67
enter 66
exit 84
enter 69
exit 70
enter 71
exit 84
enter 71
exit 70
enter 69
exit 84
enter 72
exit 73
enter 74
exit 84
enter 74
exit 73
enter 72
exit 84
enter 75
exit 76
enter 77
exit 84
enter 77
exit 76
enter 75
exit 84
enter 79
exit 80
enter 81, wrap around spine, enter 81 again
exit 82, wrap around left edge, exit 82 again
enter 83
exit 79
enter 83
exit 82
enter 81
exit 80
enter 79
exit 84
enter 80
exit 84
enter 81
exit 84
enter 82
exit 84
enter 83
exit 84
(opposite side, weave needle under thread coming from 79 and 83) enter 65
exit 4, wrap around left edge, exit 4 again
enter 3,
exit 2, tie off


 sewing pattern


